Over the last 5 years the size of an average web page gradually increased, and so did the sizes of images used.
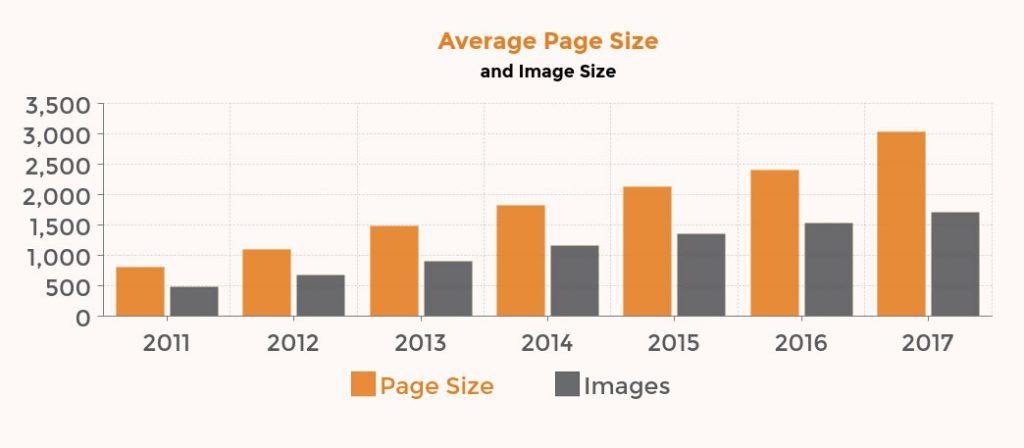
Average page size recently went over 3 Mb in size!
 Source: HTTPArchive
Optimizing images is the biggest win when it comes to website speed.
Types of image formats
Here are the most popular image formats for the Web:
-
JPG (also known as JPEG)
JPGs are the most popular file type for images on the web. JPGs are perfect for photographs, or complex images containing lots of colors, shadows, gradients, or complex patterns. JPGs handle these type of images well because JPGs have a huge color pallet to work with. They are lossy, bad at high contrast areas, edges.
-
PNG (Portable Network Graphics)
PNGs were created as a replacement for GIFs in 1996. They are best suited for images with few colors. If you use Adobe Photoshop, you probably had an option to save an image as PNG-8 or PNG-24.
PNG-8 is smaller in size, but it has a limited color palette of 256 colors.
PNG-24 has no restriction on color palette, but the file size will be larger.Most important difference between PNGs and JPGs is that PNGs can handle transparencyPNGs are often used for logos, because logos usually require transparency and they need to be high in quality.
-
GIF
GIFs were popular many years ago, mostly used for animations. GIFs have a limited color palette of 256, and tend to be bigger in size.
Do not use them! Use PNGs instead -
SVG (Scalable Vector Graphic)
Biggest difference between JPG, PNG, GIF and SVG, is that SVGs are vector graphics, and the others are raster images.Since SVGs are vector graphics, they are small in size, and they display beautifully on retina screen. SVGs can also be used inline in HTML, which will save an HTTP request. They can also be inserted as regular images.
Optimizing Images
-
Reduce physical image size (photograph dimension)
You can view image dimensions by opening the file in Photoshop and view it at 100%. Or you can also right-click on the image the Finder (on the Mac) and View Info:

It will show image dimensions and size. Photo above shows this image was taken with an iPhone and it is 3264 x 2448 in size. It’s way too large for a website. Most phones and digital cameras take large photos that are large in dimension and weight, and they need to be sized down.
Image size suited for a website depends on the theme you are using. For example, WordPress Default Twenty Seventeen theme lists Quick Specs with exact image dimensions recommended. The recommended Featured Image size is 2000px wide by 1200px high. Main column width (for a Blog section, for example) should be up to 740px wide with the one column layout.To change the physical size of the image, either use Photoshop or another program of your choice.
If you prefer Photoshop, select Image -> Image Size, and then reduce the dimensions (width/height) of the image.
You can also use WordPress Plugin – Imsanity to automatically size images on upload. This would be useful if you have website users directly uploading large image sizes to the website.
Plugin allows to set max width/height for uploaded images. -
Save image appropriately to reduce file size
(This affects the weight of the file and how much space it takes on your computer’s hard drive and/or your web server.
If you use Photoshop, there is a command called “Save For Web”. This command optimizes images to be displayed online. Regular “Save” command saves images 2-3 times bigger in size.
For photographs with many colors use JPEG format, and if you want transparency in your image, choose PNG format.I like to save for web JPEG images as Progressive quality because it will let the image fade in waves until completely loaded. This will improve user experience because there will be something happening on the screen while the full image loads, instead of it being blank.Baseline JPEG Example:

Source: darnoffice
Progressive JPEG Example:

-
Compress image file (remove unnecessary image details)
There are 2 types of image compression: Lossy and Lossless.
Lossy compression removes some pixel data and image meta data, such as how large the image is, when it was created, color resolution, etc. All these details add to image weight, and they can be removed to reduce image size. Lossy compression gives the biggest size saving, without affecting quality visible to a human eye. I would recommend using it over Lossless unless you have a photography site and you need to preserve those finer details.
Lossless (as the name implies) also removes image meta data, but it does not remove pixels, and only compresses them. Lossless compression results in bigger image sizes.You can use a web interface, such as either TinyPNG or Kraken.io. It allows you to drag and drop images from your computer and then download optimized versions, which you can then upload to your site.
To automate the process, TinyPNG and Kraken.io, both have WordPress plugins, which will automatically compress images while uploading to your site. Both of these services have a free plan that allows optimization up to a certain number of images each month.
Another popular free WordPress Plugin to optimize images is EWWW Image Optimizer. Free version uses Lossless compression.
All of these plugins allow for Bulk Optimization option. Bulk optimize will optimize all existing images on the site. I would recommend you make a backup first. You can also go to your Media Library in wp-admin and optimize images one by one.
Test your website speed before and after image optimization and see if you get a smaller page size and a faster loading time.
If you want to improve your website speed, even more, read 10 Ways to Speed Up Your Site.


